
TicketOnWheels User Guide
Find your way around, submit and manage requests, and understand the tools available to your role. Use the ? on any application screen to jump to its matching instructions.
What you can see depends on your role. Some pages in this guide are available only to support staff, company members, or administrators. An option that is not shown to you may be restricted by your account permissions.
Using this guide
TicketOnWheels brings service requests, ticket updates, assignments, service targets, and supporting records into one workspace. Start with the area that matches your task, or use the guide search and the contents list.
- Requesters submit tickets, follow their progress, reply, and give feedback when a ticket is resolved or closed.
- Support staff work assigned tickets, add public replies or private notes, update ticket fields, and use team tools.
- Administrators manage users, teams, ticket options, service levels, and other workspace settings.
- Client contacts invited by a company can view and reply to tickets linked to their company in the company workspace.
The application labels and links shown here reflect the current screens. The guide does not describe controls that are not present in the application.
Sign in and account access
Visitors who are not signed in see the public TicketsOnWheels introduction page at the site address. Choose Sign In there, or Get Started to register when public registration is enabled; otherwise Get Started opens the sign-in page. Signed-in users who open the site address go straight to their dashboard.
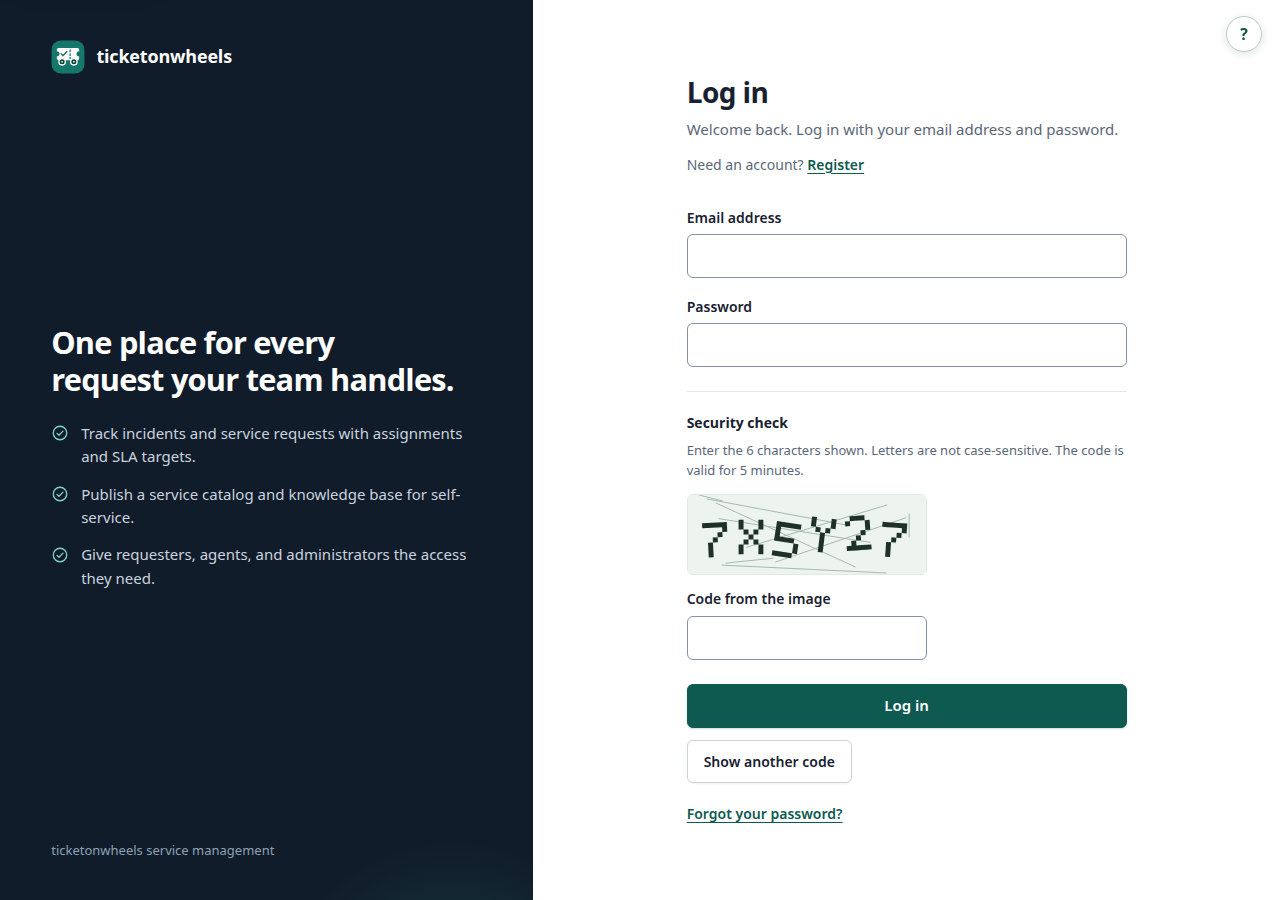
Use your email address and password on Log in. The security check on sign-in and registration must also be completed. If the code is hard to read, use Show another code.
Two-factor authentication
Two-factor authentication adds a code from an authenticator app to your password. After signing in, open My account, choose Manage two-factor authentication, enter your password, and select Set up authenticator. Scan the QR code or enter the setup key manually, then enter the app's six-digit code to finish.
Save the recovery codes in a safe place; they are shown only once and each works once. At future logins, enter an authenticator code or an unused recovery code after your password. From security settings you can regenerate recovery codes or disable two-factor authentication by entering your password and an unused code. Never share setup keys or recovery codes. If you lose both your authenticator and all recovery codes, contact your administrator for identity recovery.
Using the shared demo
At the demo installation, the site address opens sign-in directly. Choose one of the sample roles and use the login credentials shown on the sign-in page. Account registration is disabled. The workspace notice identifies the shared demo: all sample organizations and records are fictional, and other visitors may see your changes. Do not enter personal data, real passwords, or confidential attachments.
Try the Northstar or Harbor workspace as an administrator, agent, requester, or customer contact. Explore ticket histories, customer links, attachments, service levels, reports, the catalog, knowledge articles, assets, canned responses, and morning checks. To see live ticket presence, open the same ticket from two signed-in browser profiles.
All outgoing and incoming email is disabled in demo mode, even if a saved setting says otherwise. Registration, invitations, verification emails, password recovery, test email, and mailbox import are unavailable. Tickets labeled Email are sample records, not received messages. Ticket changes and in-app notifications still work. Ask the demo operator to restore a changed demo account; password-reset email cannot do it.
Create an account
If public registration is enabled, choose Register on the sign-in page. Provide your name, email, street address, ZIP/postal code, city, and phone number, and select your country from the list. Choose a password that meets the displayed requirements, complete the security check, and submit. Some installations require email verification before you can use the account.
Forgot your password?
- Choose Forgot your password? from the sign-in page.
- Enter the email address on the account and submit the request.
- Use the reset link delivered to that mailbox. A reset link is time-limited.
- Choose a new password and sign in again.
The application does not reveal whether an email address belongs to an account on the recovery screen. If you do not receive a message, check the address and contact your administrator.
My account
Open My account from the profile area. The account page shows your name, email, and account details. Use the available form to update the fields shown on your installation, then choose Save. If the email address is changed, verification may be required.
Use Sign out when you finish on a shared device. Password fields are never repopulated after a validation error.
Company workspaces
Some installations provide company workspaces. Use the workspace switcher to choose a company you belong to. A company’s tickets, teams, customers, categories, service catalog, knowledge base, assets, and service-level policies are kept within that company’s workspace.
In the local SaaS preview, an administrator can create a company from the workspace selection screen. This preview is intended for local or testing use; it is not a production multi-tenant deployment.
If a workspace is not listed, ask its administrator to invite you or confirm that your membership is active. Switching workspaces does not copy tickets or records between companies.
Roles and access
Navigation items and actions are permission-based. Requesters normally see their own tickets. Support users can see tickets allowed by their team assignment and workspace role. Administrators have additional management screens when their role grants them access.
Company members and invited client contacts are different: company members work in the service desk, while an invited client contact can access only the customer tickets and public updates shared with them. A public reply is visible to the requester and any invited contacts for the linked customer; a private note is for authorized support staff.
Seeing a button does not bypass record-level access checks. If a link returns an access or not-found page, ask an administrator to verify your role, team membership, company membership, and ticket assignment.
Dashboard
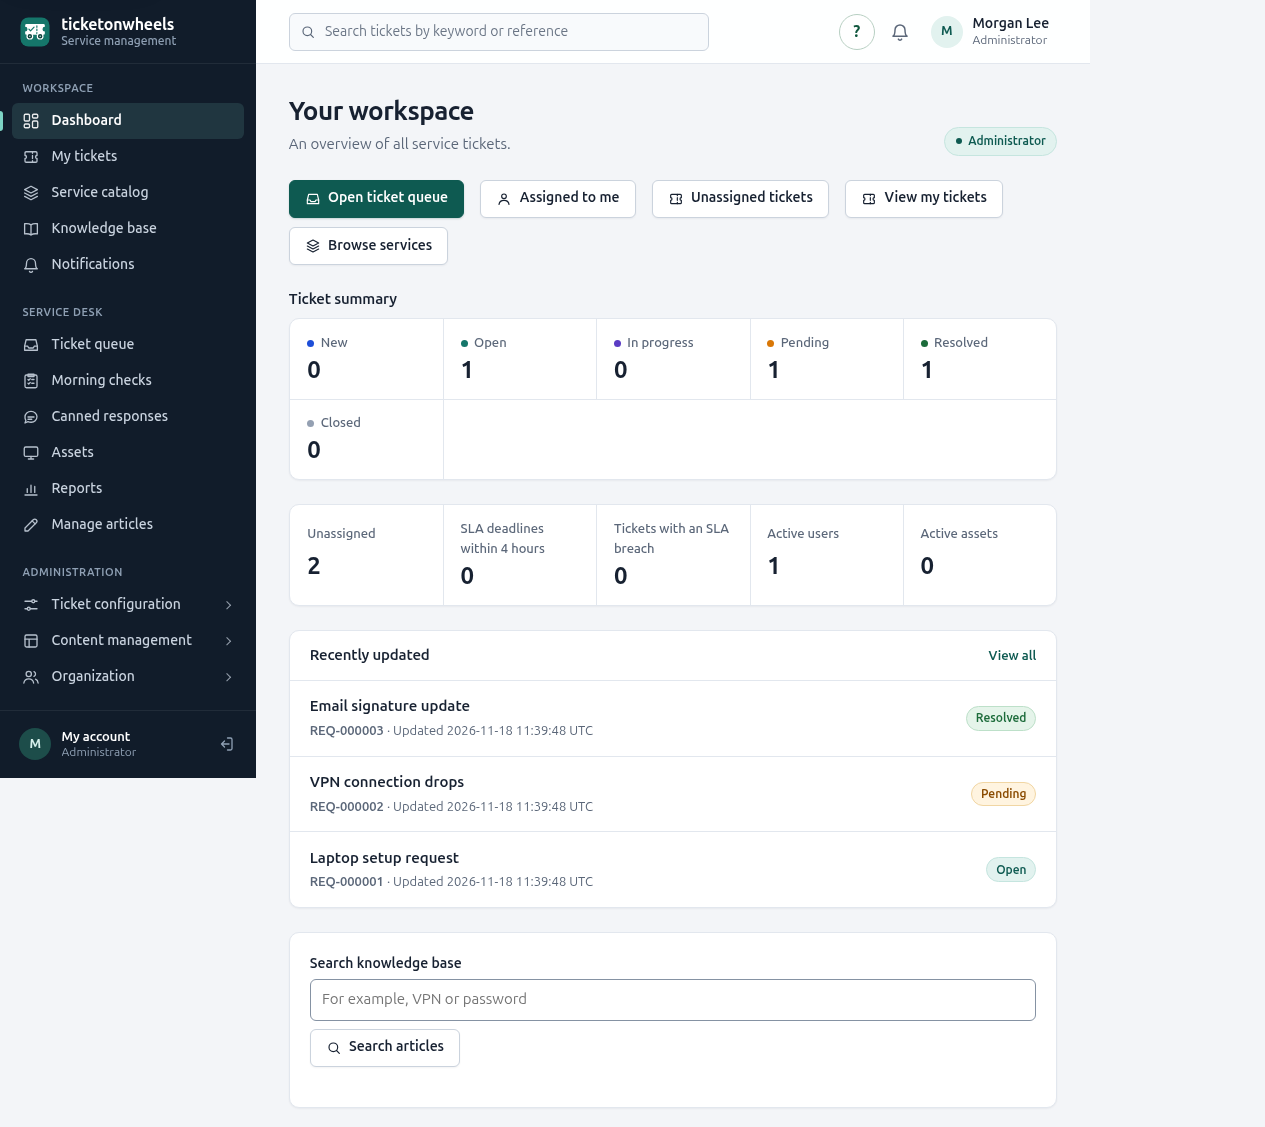
Your workspace changes according to your permissions. It summarizes ticket counts by status and links each count to a filtered ticket list. Support users may also see workload, unassigned tickets, service-level deadlines, and breaches. Administrators may see active-user and asset counts and breakdowns by priority and category.
Useful dashboard actions
- Open ticket queue takes support staff to the queue.
- Assigned to me and Unassigned tickets open common queue filters.
- View my tickets opens the tickets you submitted.
- Browse services opens the service catalog.
- The knowledge search looks for articles and returns matching results.
- Recently updated links to tickets and can show an empty state when there is no activity.
My tickets
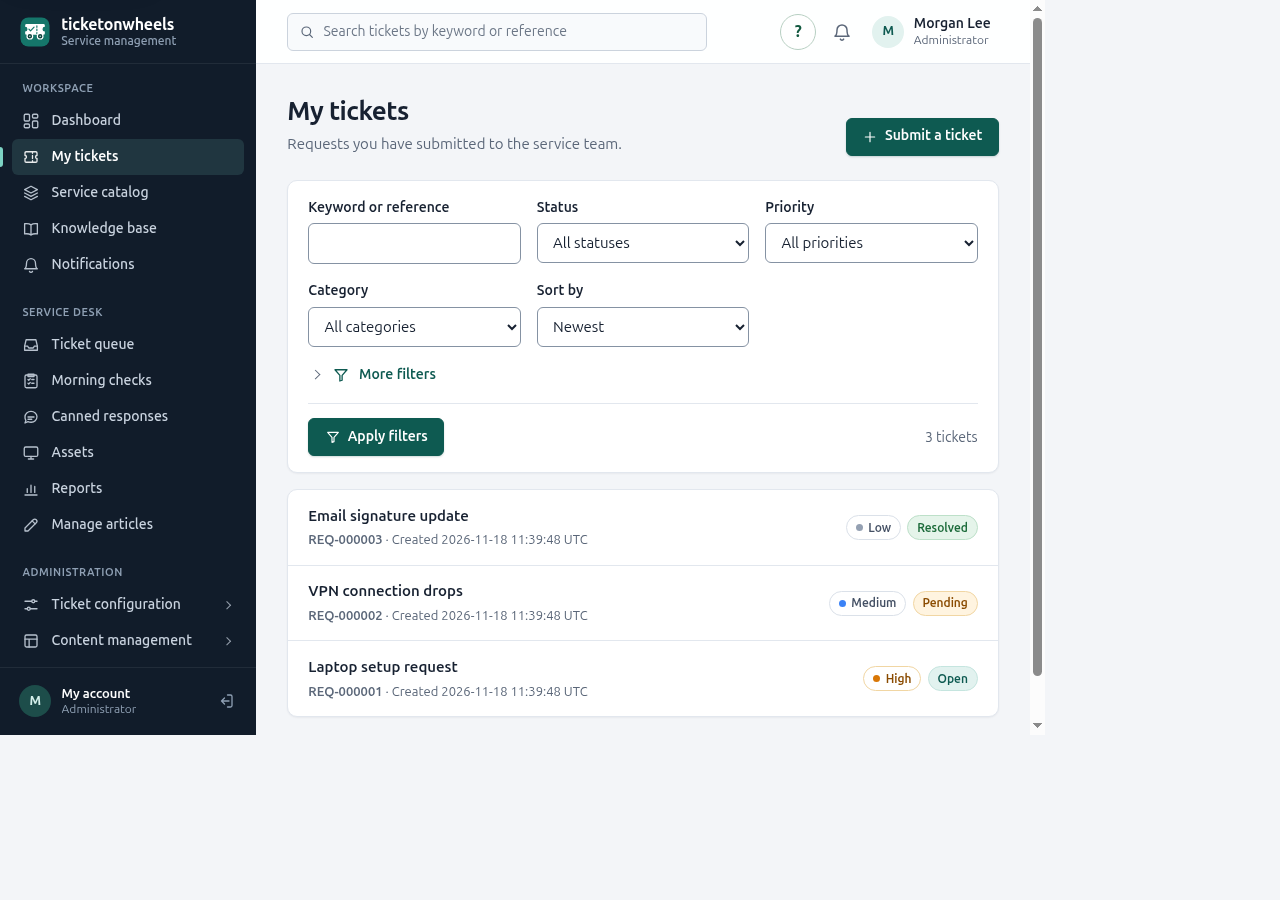
Open My tickets to review requests submitted from your account. The list shows the subject, ticket reference, creation time, priority, and status.
Find a ticket
- Enter a word or ticket reference in Keyword or reference.
- Optionally choose a status, priority, or category.
- Choose a sort order: newest, oldest, or recently updated.
- Choose Apply filters. Use Clear filters to reset the search.
- Use the page links if there are more results.
Select a ticket row to view its updates. If there are no results, check for a restrictive filter before submitting another request.
Create a ticket
Choose Submit a ticket from the dashboard or My tickets. In a service catalog flow, some details such as ticket type and category may already be selected for you.
- Choose a Ticket type when the form asks for one.
- Choose the closest Category and optional subcategory.
- Enter a short, specific Subject (up to 160 characters).
- Describe what happened, when it began, and what you have already tried in Description (up to 10,000 characters).
- Optionally attach one permitted image, PDF, text, CSV, DOCX, or XLSX file. The form shows the current size limit. Re-select the file after a validation error.
- Choose Submit ticket once. The ticket reference appears after it is created.
Good descriptions help: include relevant steps and exact error wording, but do not include passwords, payment details, API keys, or other secrets. Use a separate ticket for an unrelated issue.
Follow up on a ticket
The ticket page shows its reference, type, submitted time, priority, status, description, attachments, and activity history. Activity is shown oldest first; events recorded during the same second may be listed in either order.
Reply, reopen, or give feedback
- Use Add an update to send additional information. Attachments are optional and follow the file types and size limit shown on the page.
- When a ticket is resolved, Reopen ticket is available if you still need help.
- When the ticket is resolved or closed, the satisfaction form may let you submit one rating from 1 to 5 and an optional comment. Feedback cannot be changed after submission.
- Use the attachment links to download files you are authorized to see.
Do not create a duplicate ticket if the existing request is still open; add a reply to its activity instead.
Support ticket queue
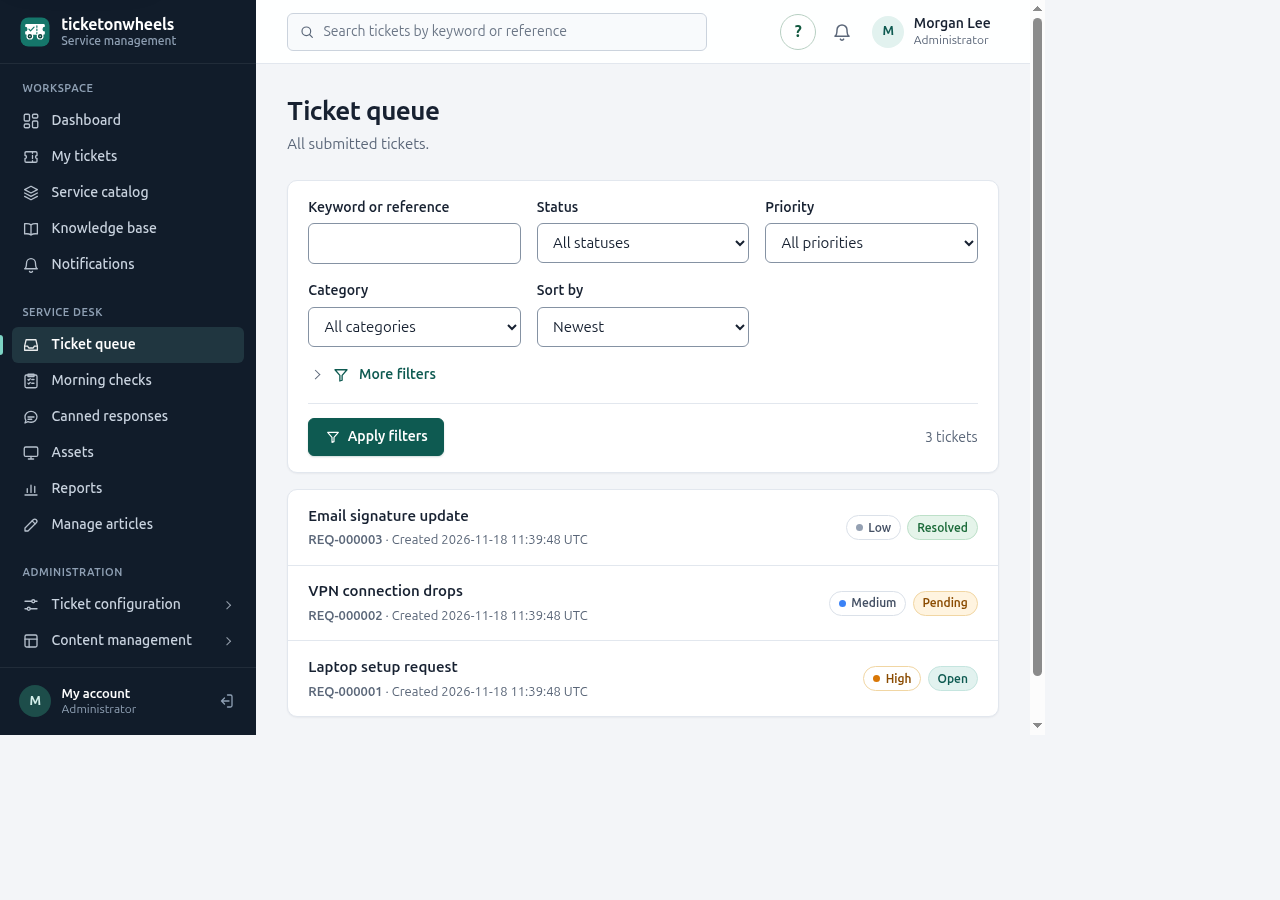
Support staff use Ticket queue to find permitted team work. A non-administrator may see tickets assigned to them and unassigned tickets in their active teams; administrators can have broader visibility.
Use the same keyword/reference, status, priority, category, sort, SLA state, and date filters as the My tickets list. The More filters area also offers assignment, team, agent, and requester filters when available. Created and updated date filters use UTC.
Use Assigned to me to focus on your tickets and Unassigned to find work that still needs an owner. Open a row to work on its details.
Work on a ticket
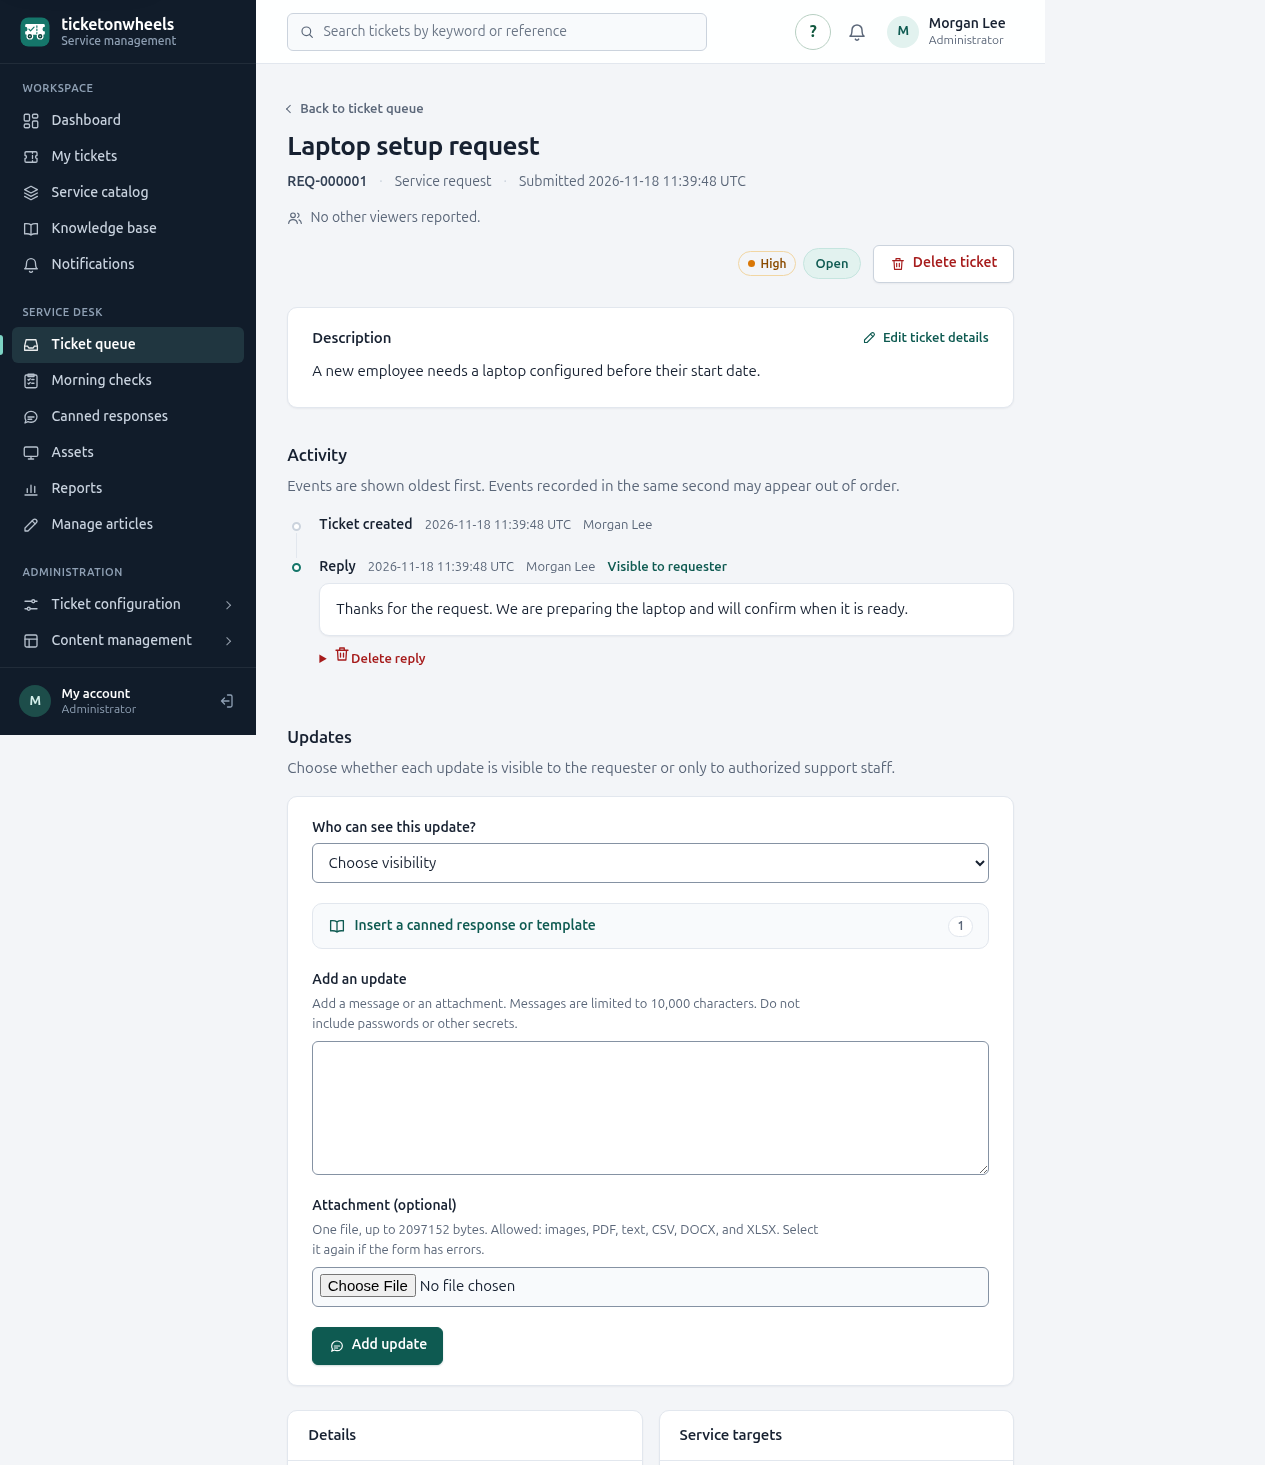
The support ticket page combines the description, attachments, activity, reply editor, and ticket properties. Use the right-hand properties area to make one change at a time; each change has its own action button.
Ticket properties
- Change status: choose a status and submit. Status changes are visible to the requester.
- Change assignment: an administrator selects a team and an active verified agent belonging to that team. An agent may use Assign to me when the ticket is unassigned.
- Change priority, category, or source: choose the appropriate current option and submit.
- Change customer: in company workspaces with customer access, link a customer and optionally a specific contact. Invited contacts can then view the ticket and its public updates and attachments.
- Record time: enter minutes and an optional note. Time entries are visible only to authorized support staff.
- Related asset: use asset links when your role has access to assets.
Public replies and private notes
Before writing an update, choose who can see it. Use a public visibility option for information intended for the requester (and, in a linked company customer flow, invited contacts). Choose Support staff only (private note) for internal coordination. Check the visibility selector before every submission.
Choose Add update to submit the reply or note. The body is limited to 10,000 characters. Never put secrets in a message. The canned response selector inserts text only; it does not send it.
Delete ticket and updates
If you have permission to delete a ticket, expand Delete ticket and read the warning. Permanent deletion removes the ticket, its replies, private notes, time entries, and attachments; audit records remain. Individual replies or notes may also be deleted by an authorized user from their activity item.
Edit ticket details
Choose Edit ticket details beside the ticket description to change its subject or description. Make your changes and choose Save ticket details. The page uses a version check to avoid silently replacing a concurrent edit. If it asks you to reload, copy your text first, reload the latest record, and reapply your changes.
Changing the category, status, priority, source, assignment, or customer is handled by its separate action on the ticket detail page rather than this edit form.
Customer ticket portal
In a company workspace, a contact who has accepted a client invitation can open Customer tickets. The portal shows only tickets linked to the contact’s company that the contact is allowed to access.
- Accept the invitation from the invitation link while signed in or by creating the invited account as prompted.
- Open Customer tickets to find current company tickets.
- Open a ticket to read its public conversation and authorized attachments.
- Write a reply and choose Send reply to add it to the conversation.
Customer ticket details
On a customer ticket page, review the reference, subject, status, public conversation, and permitted attachments. Enter a reply in the update form and submit only when it is ready to share with support. Client contacts do not get the support-only private-note selector or ticket administration actions.
Client contacts cannot see support-only private notes or the service desk administration screens. If the ticket is not listed, ask the company’s support team to verify its customer link and your invitation.
Customers and contacts
The Customers area is available to authorized support staff in company workspaces. A customer is a company relation; contacts are people associated with that customer. Customer and contact records can be attached to a ticket by an authorized support user.
Create a customer
- Choose Add customer.
- Enter the customer Name and choose a Relation type.
- Optionally add account number, email, phone, website, address, and internal notes.
- Leave Active selected if the customer can be linked to new tickets. Inactive customers keep existing links but cannot be selected for new ticket links; deactivation also revokes their contacts’ ticket access and pending invitations.
- Choose Save customer.
Open a customer to add or edit contacts and review linked tickets. Contact forms capture the person’s details and status; invitations can grant a client contact access to eligible tickets. Revoke an invitation when access should end.
Use the ticket’s Change customer action to attach a customer, optionally choosing a specific contact. Customer links are separate from ticket requester ownership.
Notifications
The bell and Notifications page show notifications available to your account. Open a linked item to review it. Choose Mark as read on one notification or Mark all as read to clear the unread count.
Notifications do not grant access to a ticket or other record. You still need permission to open the linked item.
Service catalog
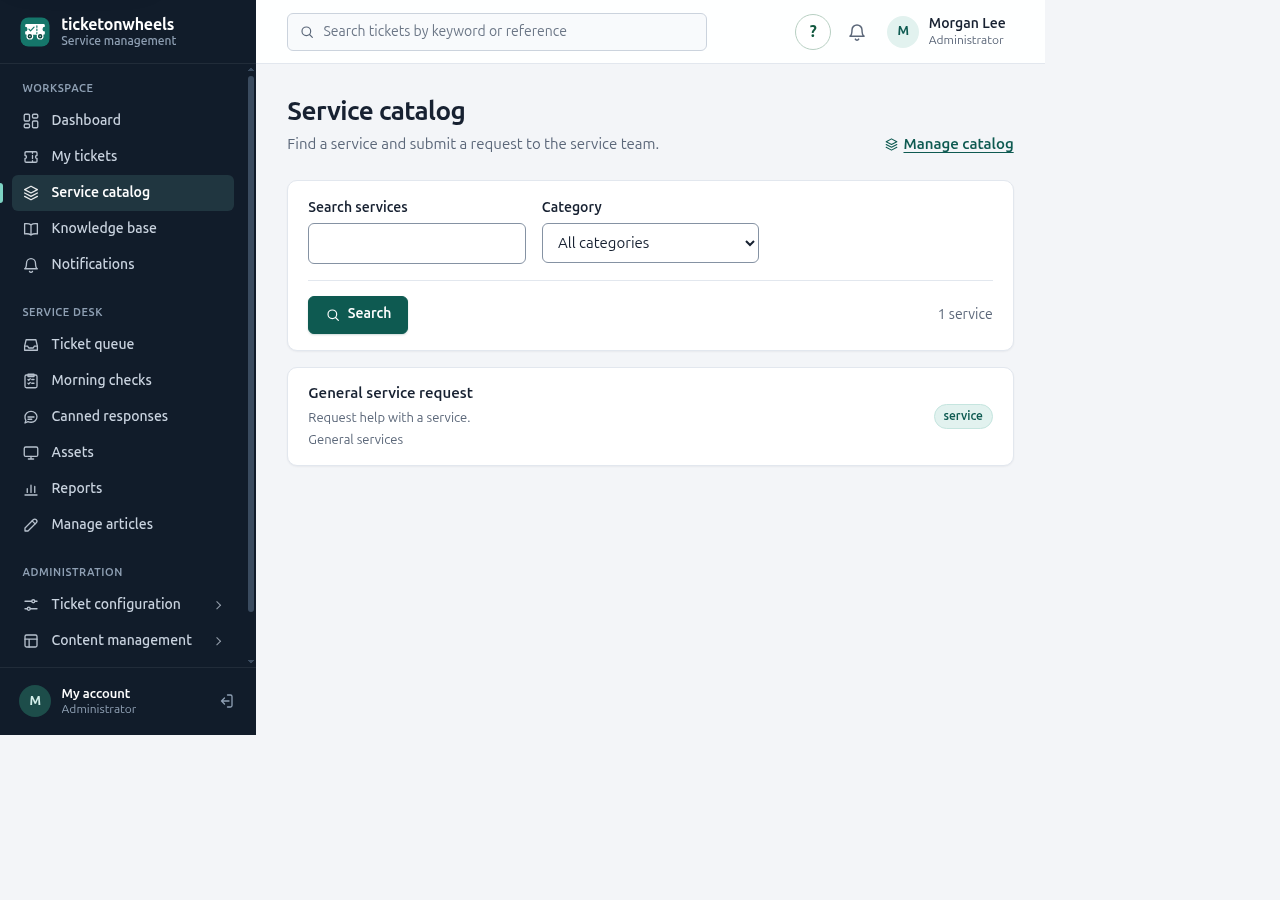
Browse services to see their descriptions, category, and request instructions. Search by service name or filter by category. Open a service to review its details, then choose the request action shown on the page to start a ticket with that service attached.
Inactive categories and catalog items are hidden from requesters. If a selected service becomes unavailable before submission, choose another available service.
Manage the service catalog
Authorized administrators open Catalog items and Catalog categories from Content management.
- A catalog item has a name, short and full descriptions, request instructions, category, optional expected delivery time in minutes, a short service marker, and active/inactive status.
- A catalog category groups items. Inactive categories and their items are hidden from requesters.
- Choose Create or Save after reviewing the form. A version conflict means someone else edited the same record; reload before trying again.
- Use the confirmed deletion action when an item or category is no longer needed. Records with dependent use may be protected.
Expected delivery time is a catalog description, not an SLA guarantee. Configure an SLA policy separately when service targets are required.
Knowledge base
Search or browse articles by category. Open an article to read its content. A view may be recorded when you choose the view action on the article page. Use the dashboard knowledge search or the knowledge page search when you are looking for an answer before opening a ticket.
Only published articles that match their visibility are shown to you. If an article is missing, it may be unpublished or restricted to a different audience.
Manage knowledge articles
Users with knowledge-management permission can create and edit articles. Enter a Title, URL-friendly Slug, Summary, article content, category, publication status, and visibility. The slug uses lowercase letters, numbers, and single hyphens; it becomes part of the article URL.
Use draft status while preparing an article. Choose a published status only when the content is ready for its selected audience. Knowledge categories are managed from Content management. If a concurrent-edit warning appears, copy your draft, reload the latest version, and reapply it.
Assets
Authorized users can search the asset register and open an asset to see its identifying details and links to tickets. Choose Add asset to create one or Edit to update the existing record.
Asset fields include asset tag, name, type, manufacturer, model, serial number, status, assigned user, location, purchase date, warranty expiration, and notes. Asset tags should be recognizable and unique in the workspace. Leave an asset unassigned if no owner is known.
Link or unlink an asset from a ticket using the available actions. Removing a link does not delete the ticket or asset. Asset removal uses the confirmed deletion flow; a record referenced by other data may be protected.
Ticket reports
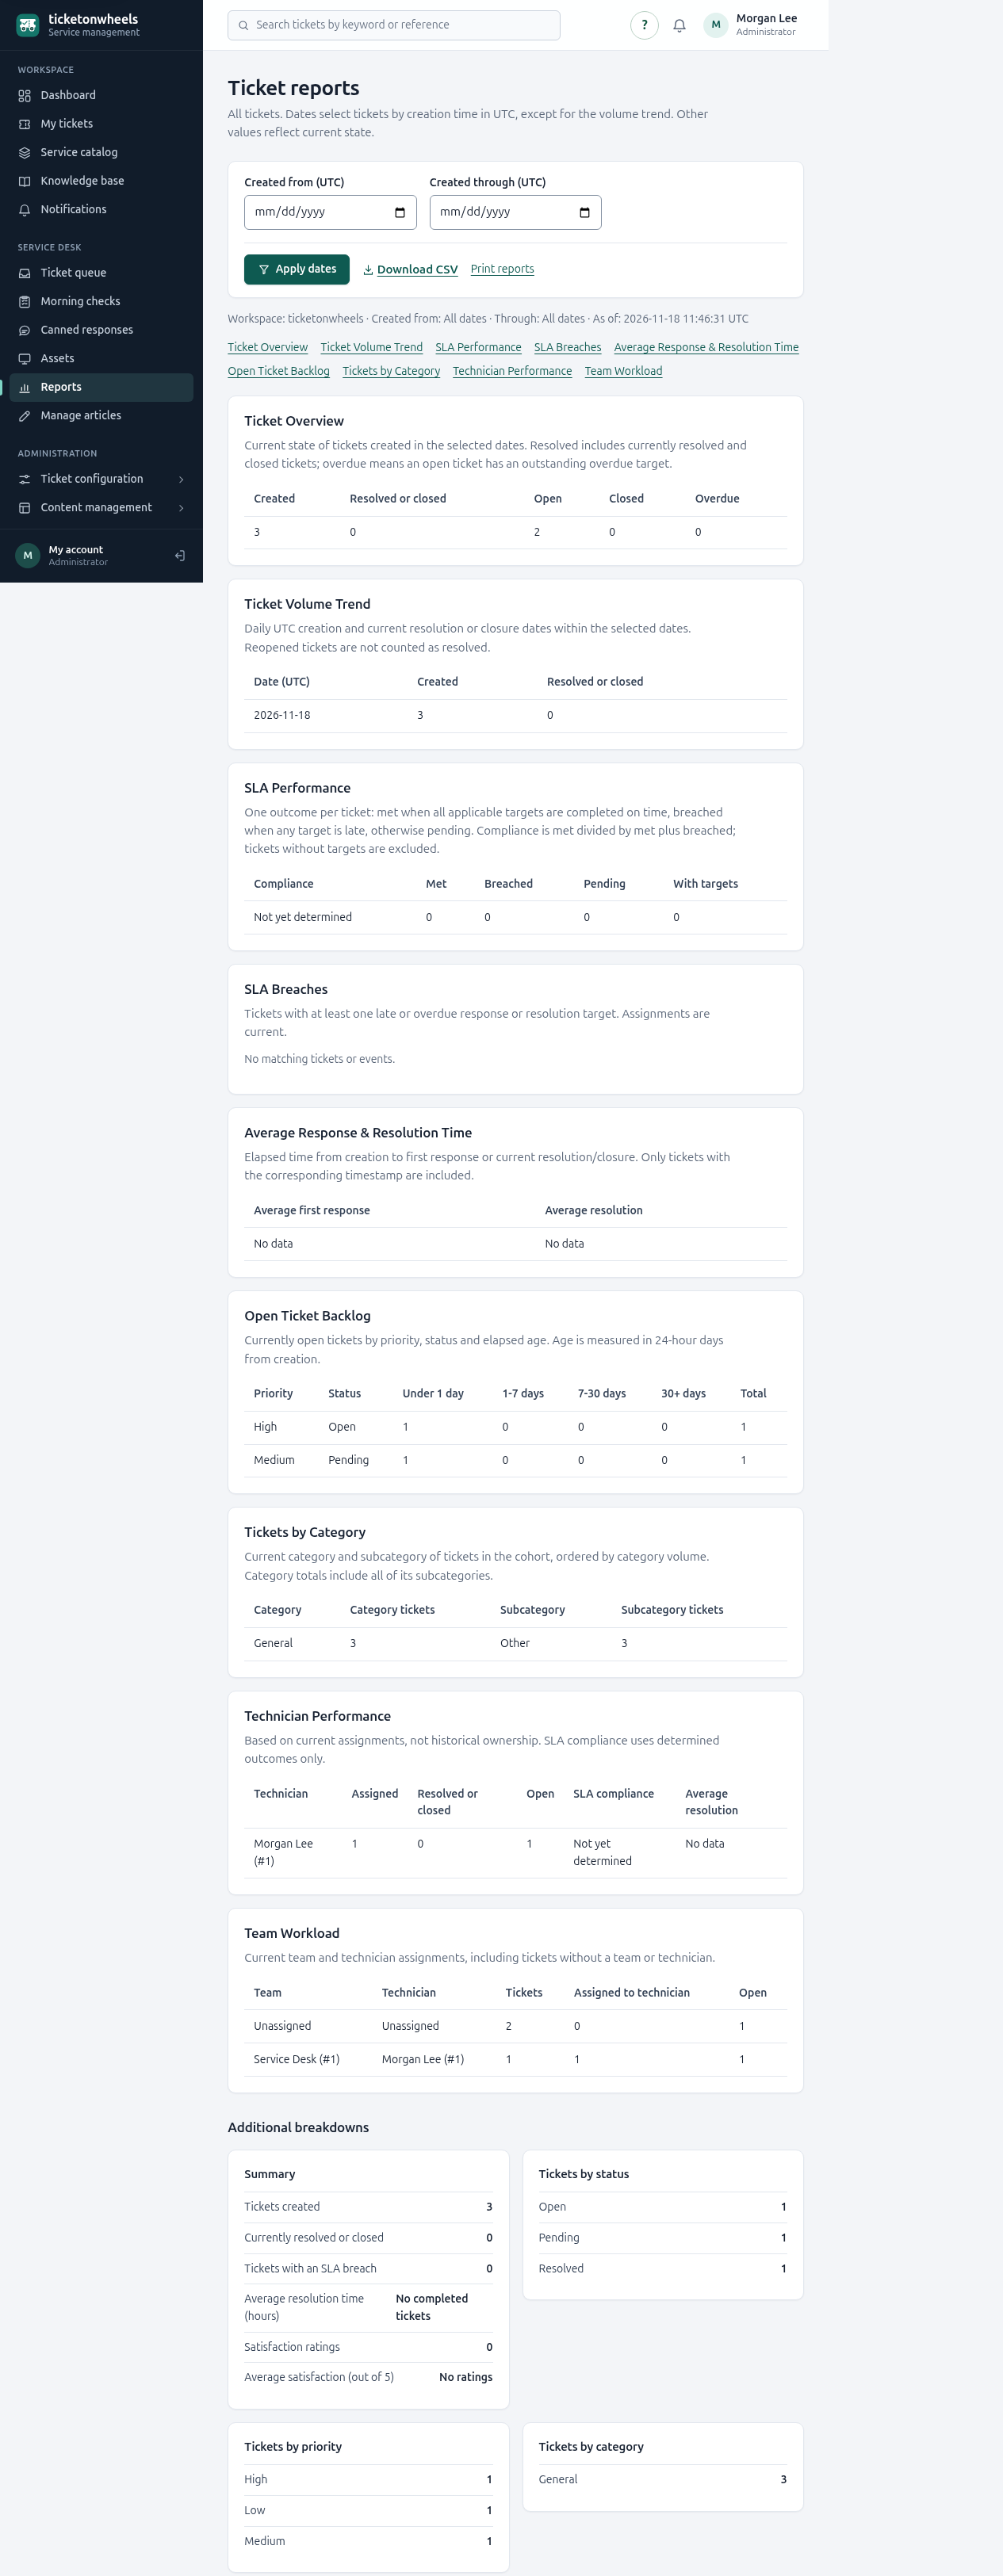
The Reports page contains the ticket overview, volume trend, SLA performance and breaches, response and resolution timing, backlog, category, technician, and team workload reports available to your role. Support staff see only the tickets allowed by their access; administrators may see broader workspace totals.
Choose a period and export
- Set Created from (UTC) and Created through (UTC). Leave a date blank to keep that end open.
- Choose Apply dates. The selected period is printed with the report.
- Use the report-section links to jump to a table, or scroll wide tables sideways.
- Choose Download CSV for spreadsheet-compatible data, or Print reports to open the browser print dialog.
The date range selects tickets by creation time in UTC, except for the volume trend. Most other report values reflect the ticket’s current state, not a historical snapshot. Empty tables mean no matching tickets or events.
Morning checks
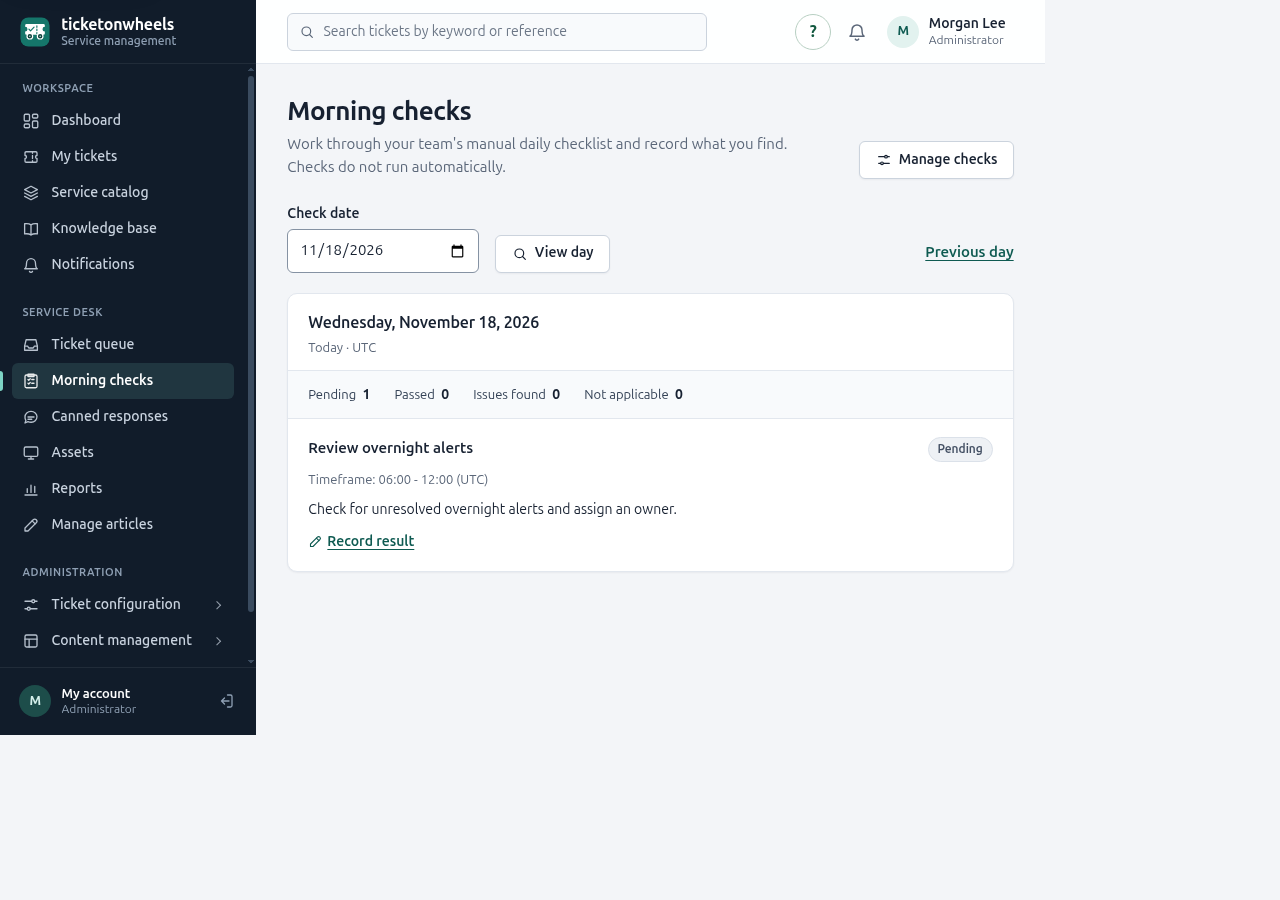
Morning checks are a manual daily checklist. They do not monitor services or create tickets. The date uses the application time zone shown on the page.
Record or update a result
- Open Morning checks and choose the check date. Use the day links to move between dates.
- Read the check instructions and any optional target timeframe.
- Choose Record result or Update result.
- Select Passed, Issue found, or Not applicable. Add notes when an issue is found.
- Choose Save result.
Today's active checklist can be corrected until the local day ends; saving replaces the same day's result. Past dates show recorded results only and do not recreate unfinished items. The optional start/end timeframe is informational. The end must be later than the start on the same day.
Manage checks
Administrators choose Manage checks, then create or edit a check. A check has a name, optional instructions, optional daily start and end times, and active/inactive status. Deactivating a check preserves its history.
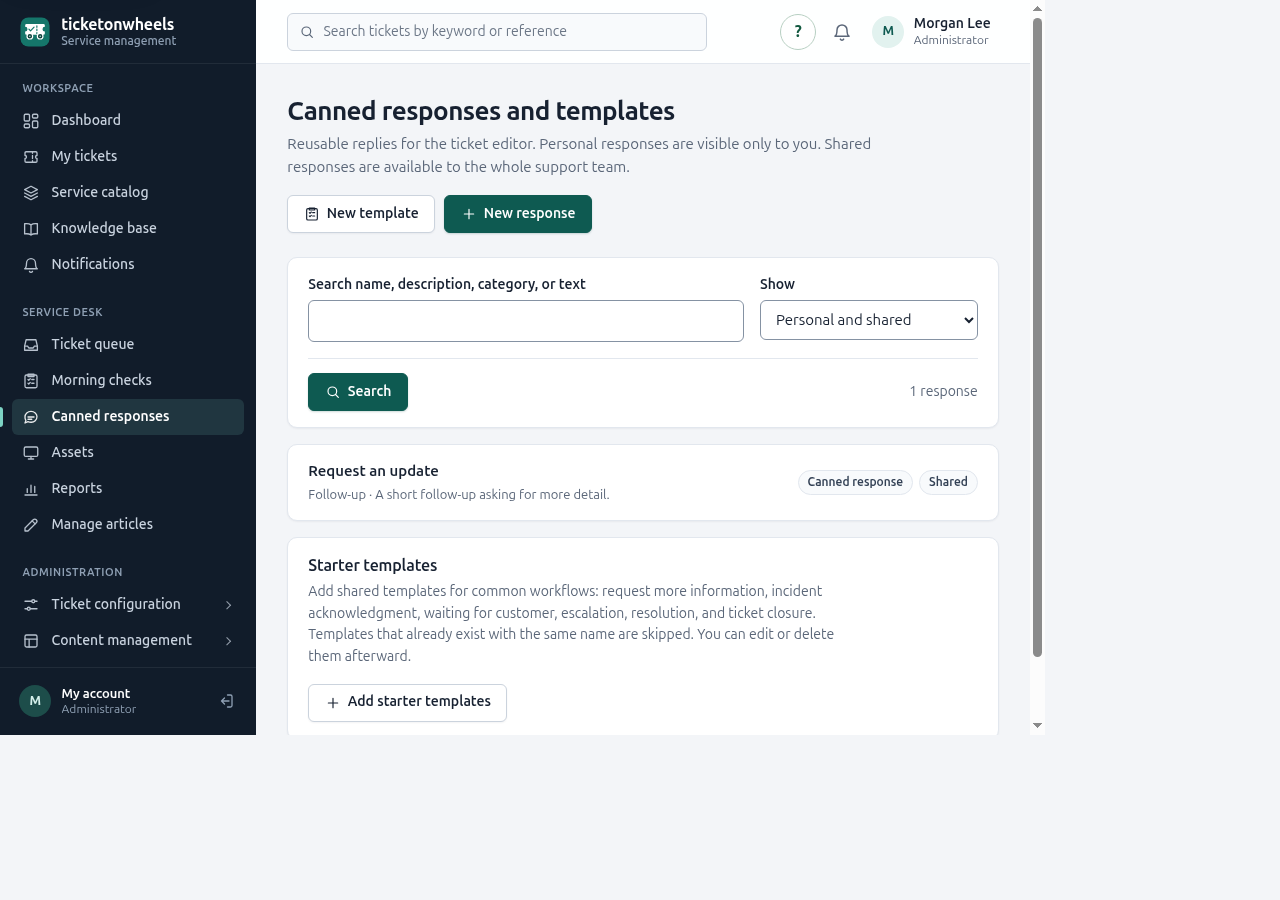
Canned responses and templates
Support staff use this page to create reusable plain-text replies. Personal responses belong to their creator; shared responses can be used by the support team and are managed by authorized administrators.
Create a response or template
- Choose New response or New template.
- Enter a name, optional description, optional category, type, and response text.
- Choose personal or shared visibility when that option is available. Visibility cannot be changed after creation.
- For a template, optionally propose a status, priority, category/subcategory, or assignment to the agent who uses it.
- Choose whether it is active, then choose Save response.
Response text accepts known variables shown beside the form. Unknown variables are rejected. The body is plain text; HTML or code is not executed. Inactive responses do not appear in the ticket picker.
Use the picker safely
On a support ticket, open Insert a canned response or template. Search, filter by category or personal/shared/template, select Favorites or Recently used, and preview the text. Choose Insert into update to put it at the cursor. The reply is not sent. Review proposed changes in the blue “not applied” panel; Review change only fills a ticket field. Submit that field separately to make the change.
Available variables are {{ticket.id}}, {{ticket.number}}, {{ticket.subject}}, {{ticket.status}}, {{ticket.priority}}, {{ticket.requester.name}}, {{ticket.requester.email}}, {{agent.name}}, and {{current.date}}. Missing requester details become blank. Values are inserted as plain text and substituted only once.
Administrators can add six starter workflow templates. Adding them again skips names already present.
Support teams
Administrators with team-management access open Support teams under Organization. Create a team with a name, optional description, active status, and optional default category. Open a team to edit those details and add or remove agents.
Only eligible active team members can be selected as ticket assignees. Removing an agent can return affected tickets to the team queue. Check ticket assignments after changing team membership.
Company members and invitations
Company administrators manage company membership from Company members. Invite an employee by email, choose the offered role, and send the invitation. The person must accept the invitation to join. Administrators can change a member’s role or remove the member.
Removing a member clears company-specific asset and ticket assignments and may return tickets to a team queue. Transfer administrator duties before removing the last administrator. Company invitations and membership changes are recorded in the company audit log.
Each newly created company records its creator as owner. On Company members, the owner can offer ownership to another active, verified company administrator. Ask the recipient to open that page and accept within seven days; no transfer email is sent. The current owner can cancel the offer. Transfer ownership before removing or demoting the owner or deactivating their account. If an older company has no recorded owner, contact a SaaS administrator to verify and assign one.
An invitation link is private to its recipient. Do not forward it. If it expires or has been revoked, ask the administrator to send a new invitation.
User administration
Authorized administrators use Users to find a user and review their profile, role, verification, and active state. Open a user to update the available access settings and save. Deactivation is blocked when it would leave a company without an administrator.
Role assignment affects which application screens and records the user can access. Before changing access, confirm that the person’s team and company memberships match their responsibilities.
Ticket categories
Administrators manage categories and subcategories from Ticket configuration → Categories. Add a category, edit its name or active state, and add or edit subcategories underneath it. Inactive choices are not offered for new ticket classification.
Use a small, clear set of categories so requesters and agents can classify tickets consistently. Existing tickets may retain a historical association even when a choice is deactivated.
Statuses, priorities, and sources
Administrators manage the status, priority, and source options from Ticket configuration. Each option has a code/name and an active state. The visible name is shown to users; the code identifies the option internally.
- Status describes where work stands (for example New, Open, In progress, Pending, Resolved, or Closed).
- Priority communicates urgency (for example Low, Medium, High, or Urgent).
- Source records how the ticket arrived, such as a portal or email.
Do not deactivate an option merely to correct one ticket; change that ticket’s field instead. A status or priority already used by tickets may be protected from deletion.
SLA policies
Administrators configure service targets from SLA policies. A policy has a name, optional description, priority scope, first-response target in minutes, resolution target in minutes, and active/inactive status. In a company workspace, a policy can also be associated with selected customers.
Review units carefully: both response and resolution values are minutes. A policy applies only where its scope and customer association match the ticket. Ticket details show whether targets apply and their deadlines. The report and queue can show breached or approaching targets.
Changing a policy does not guarantee that an old ticket’s stored service targets are retroactively recalculated. Ask an administrator before changing a policy that is already in use.
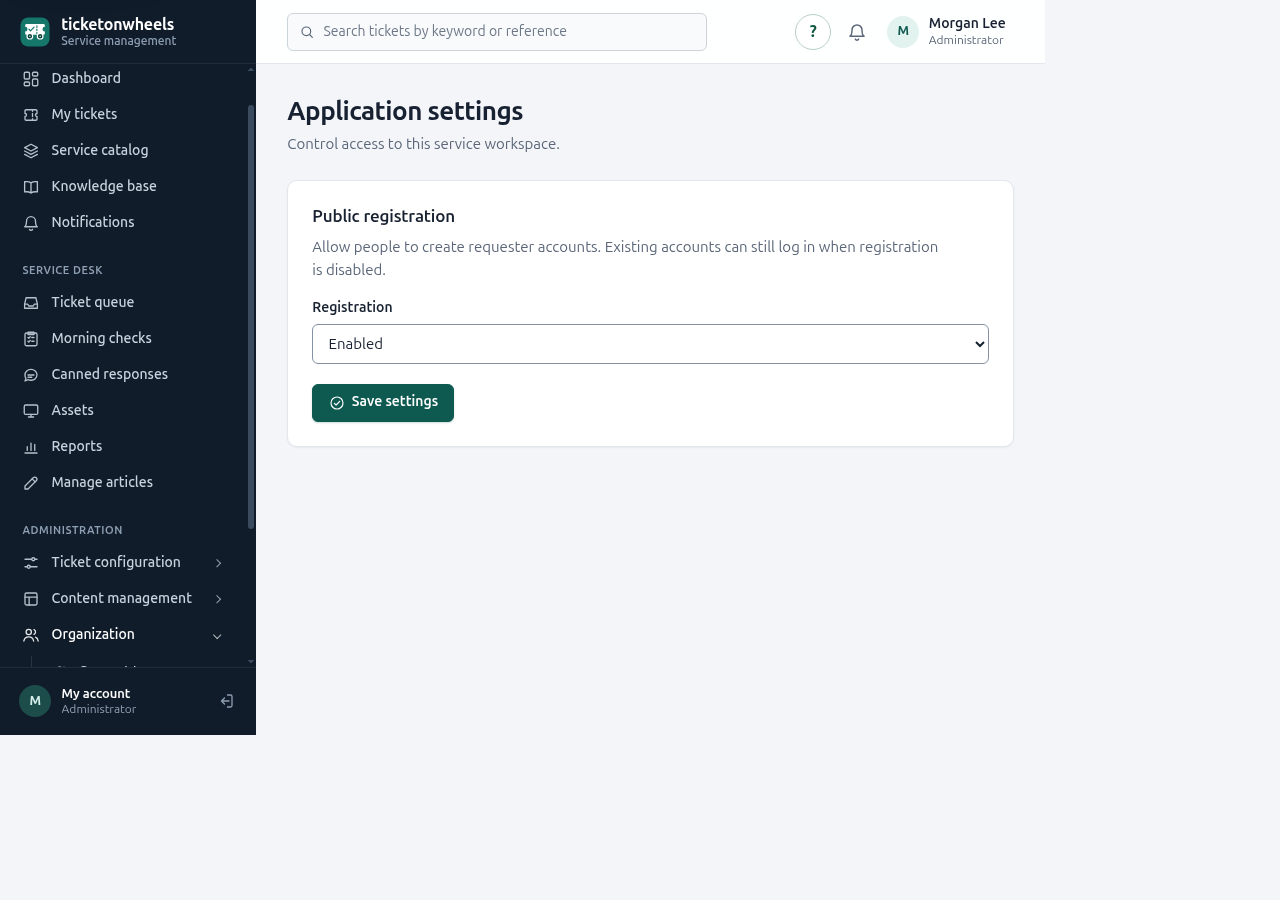
Application settings
Application settings currently include public registration. When registration is disabled, existing users can still sign in, but new requester accounts cannot self-register. Only an administrator with settings permission can change the setting.
Choose the intended registration state and select Save settings. If another administrator has changed the setting since the page loaded, reload and review the current value before saving again.
Support email
Authorized administrators configure a dedicated IMAP mailbox from Support email. The screen shows whether intake is not configured, paused, or enabled, as well as the latest check result.
- Enter the dedicated Support email address.
- Select an approved IMAP server.
- Choose TLS (port 993) or STARTTLS (port 143).
- Enter the mailbox username and password or app password. On an existing setup, leave the password blank to keep it if the server, security, and username are unchanged.
- Choose whether automatic ticket creation is enabled or paused, then save.
When enabled, intake imports existing as well as new messages. New tickets are owned by the administrator who saves the settings. Use Pause intake to stop importing. Mailbox credentials are private and are not displayed after saving. Ask the deployment administrator to configure approved IMAP hosts; do not paste credentials into a ticket or chat.
Email notifications
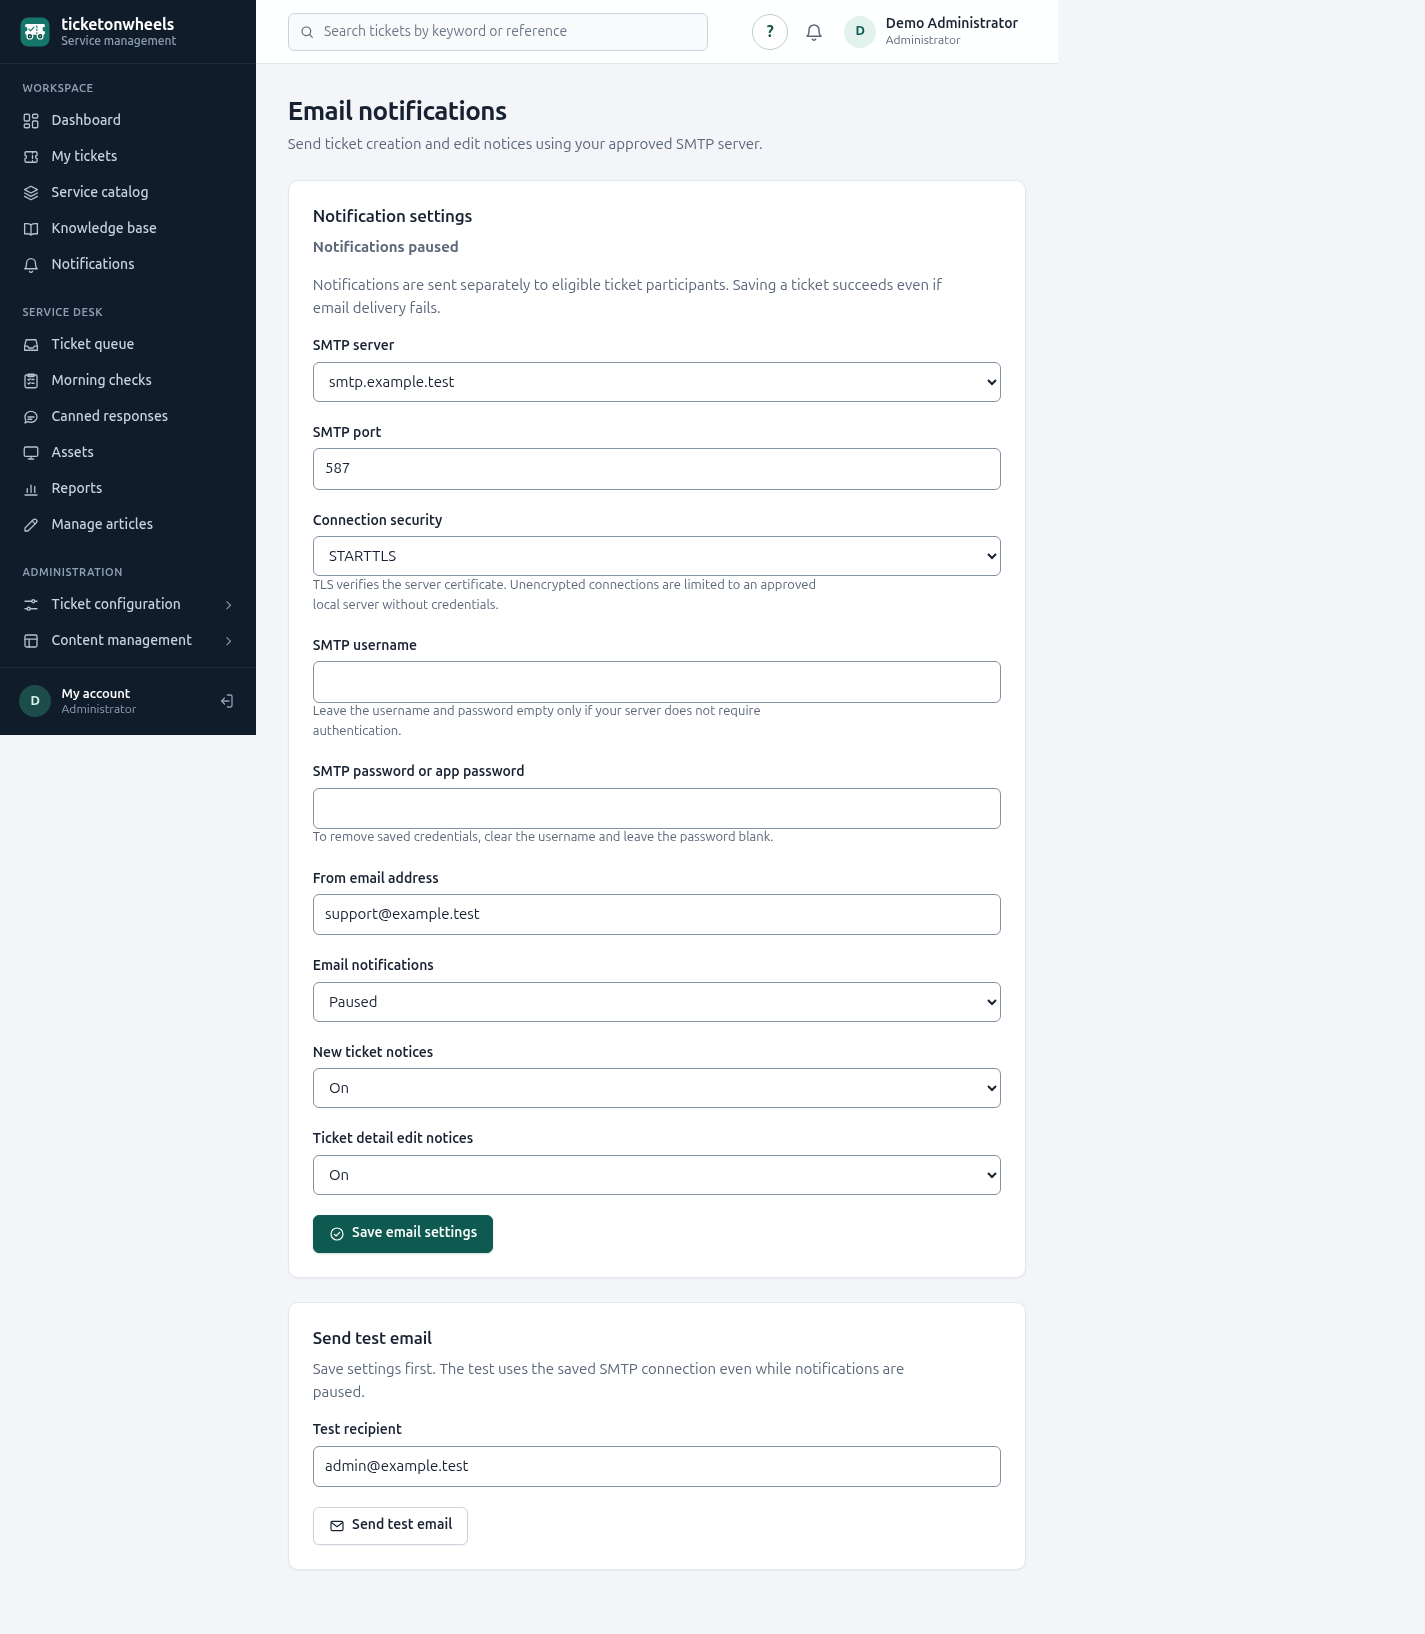
Verified administrators can configure outgoing ticket notices under Organization → Email notifications. In a company workspace, select the company first; its settings are separate from other companies. These settings are separate from the incoming Support email mailbox and from account-verification email.
Configure and test outgoing email
- Ask your deployment operator to approve the SMTP server in
TICKET_SMTP_HOSTSand configure the trusted application URL. If no server appears, the operator must update the allowlist and restart the application processes. - Choose the approved SMTP server and enter its SMTP port. Your provider normally uses port 587 for STARTTLS or 465 for implicit TLS; use the values they provide.
- Choose Connection security. STARTTLS upgrades the connection; implicit TLS encrypts it from the start. Both verify the server certificate. The None option is restricted to an approved localhost server without credentials in local/testing environments.
- Enter the SMTP username and password or app password if authentication is required. Leave both blank for a server that does not require authentication. The password is encrypted and never shown after saving. When the server, port, security, and username are unchanged, leave the password blank to keep it. To remove saved credentials, clear the username and leave the password blank.
- Enter an authorized From email address. A display name, Reply-To, CC, and BCC are not supported by this mail path.
- Choose whether Email notifications are enabled or paused, and turn New ticket notices and Ticket detail edit notices on or off. Select Save email settings. Use Pause notifications to stop notices quickly.
- Under Send test email, enter a controlled recipient and choose Send test email. The test uses the saved settings, even when notices are paused; save changes first. A confirmation means the SMTP server accepted the message, not that it reached the inbox.
Events and recipients
New-ticket notices are sent after a ticket is created in the portal or imported from support email. Edit notices are sent after support saves changes to a ticket's subject or description using Edit ticket details. Replies, private notes, assignment, status, priority, and other actions do not send these emails.
Eligible recipients are the requester, the assigned agent, and the linked customer contact with accepted, active customer-portal access. Each must have an active, verified account and current permission to view the ticket. Other customer contacts are not automatically included. The importer does not trust or notify the incoming message's unverified From address. Duplicate addresses are sent only once, and recipients receive separate messages.
Each notice contains the ticket reference, subject, and a link appropriate to the recipient. It does not include the description, replies, private notes, or attachments. Sign in and, if necessary, select the correct company to open the ticket.
If delivery fails
A ticket is still created or saved if notification delivery fails. Ask the administrator to check that notices and the event are enabled, the server remains approved, the recipient is eligible, the address and port are correct, and the provider accepts the saved credentials. Check the recipient's spam folder and the private application log. Do not share passwords or provider responses in a ticket.
Messages are sent directly after saving, not stored for automatic retry. If the application says delivery could not be confirmed, the server may already have accepted the message; check with the provider before sending another test. Outgoing mail is separate from the PBreeze account-email queue.
Audit log
Users with audit permission can review recorded administrative and business changes. Use available filters or pagination to find an event. Audit descriptions are intended to explain what changed and who performed it; they do not replace the record itself.
Audit entries may remain after a record is deleted. This is intentional and helps administrators understand past actions. If the list is empty, no entries match the current view.
Confirmed record deletion
Where deletion is supported, it requires a confirmation page or a clearly labeled confirmation control. Read the record name and warning before choosing the permanent-delete button. Deletion cannot be undone.
Some records cannot be deleted while tickets, history, or other records depend on them. If deletion is blocked, review the warning and update or unlink the dependent record first. Ticket deletion is separate and removes its updates, notes, time entries, and attachments while retaining audit records.
Delete your account or a company
On My account, choose Review account deletion to remove your account and every company you own. To remove only one company, select it and choose Review company deletion on Company members. Only the company owner can delete a company; their account remains. You need a verified, active account. Deletion is unavailable in demo mode.
Review the companies and members shown, enter your current password and, if enrolled, an unused authenticator or recovery code, then type DELETE and choose the permanent-delete button. The second factor is required even if your administrator has temporarily bypassed MFA for login. If ownership or membership changes, review the updated list before trying again. You will be signed out after deletion.
Company records, tickets, and company audit history are removed. Member accounts used only by deleted companies are removed when possible; accounts used elsewhere or required by other records are retained. Suspended companies, active or unresolved mail, other references, or platform administrator status can prevent deletion. Contact a platform administrator if deletion is blocked.
Attachments are scheduled for removal; contact the platform administrator if cleanup is reported as pending. Existing backups and copies already delivered to email providers are not removed or recalled.
Never use a browser refresh to repeat a deletion unless the application explicitly confirms that the first attempt did not complete.
Troubleshooting and safe use
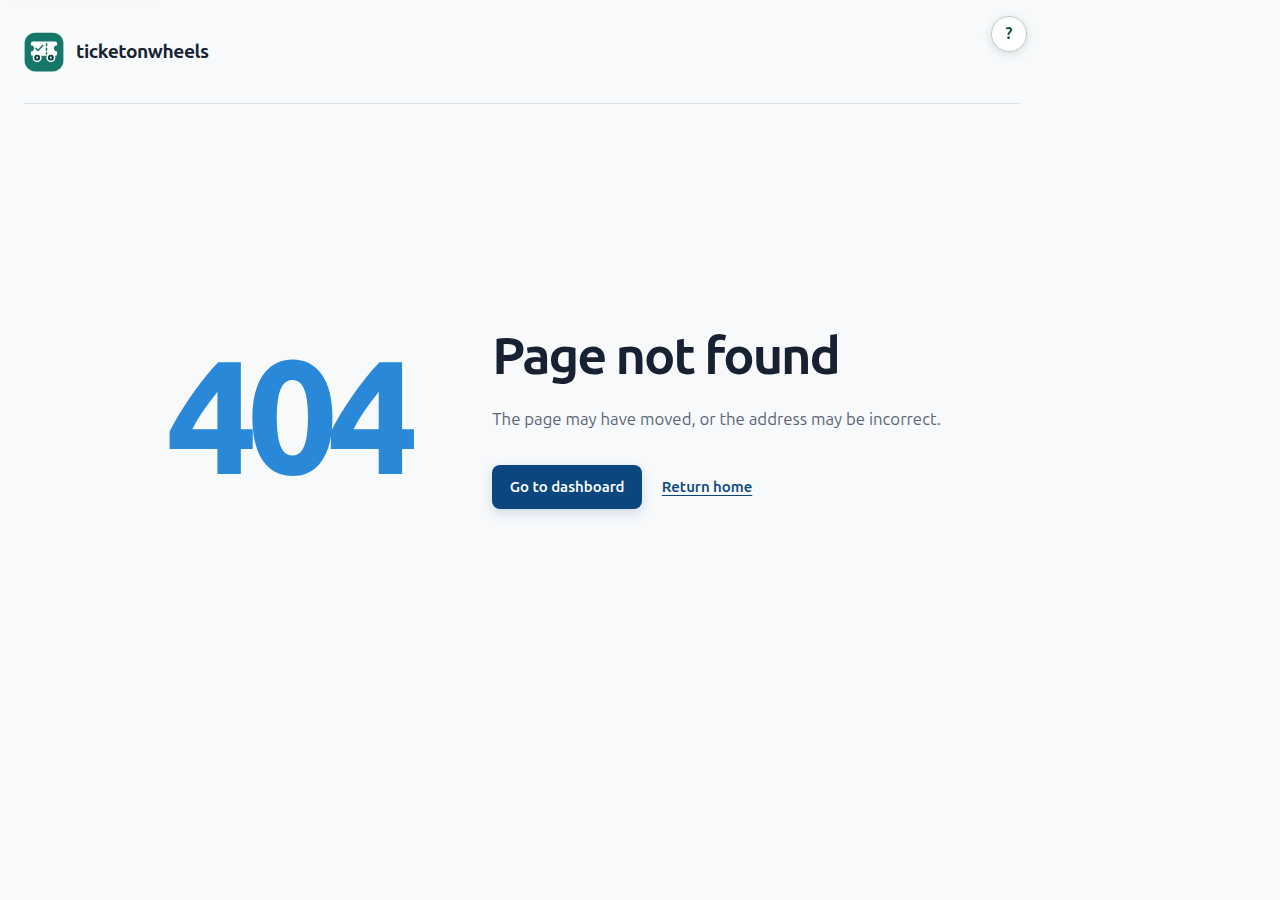
If a page is unavailable, choose Go to dashboard or Return home on the error page. If an unexpected server error continues, note what you were doing and contact your administrator without sharing passwords, tokens, or private customer details.
- A page or button is missing
- Your role, company membership, or team assignment may not grant access. Ask an administrator to check your active status and permissions.
- A ticket does not appear in search
- Clear filters, confirm the ticket reference, and check that the correct workspace is selected. Support visibility follows team and assignment permissions.
- The page says to reload
- Another user may have changed the same record. Copy unsaved text, reload the current version, review the differences, and submit your changes again.
- An attachment is rejected
- Check the file type and the size limit shown beside the upload control. Re-select the file if the form returns validation errors.
- A service target is missing
- The ticket may not match an active policy or customer association. Ask an administrator to review the ticket priority, customer, and SLA policy scope.
- Support email is not creating tickets
- Check the intake state and last check result, then ask the administrator to verify IMAP settings and mailbox access. Do not share the password while troubleshooting.
- Ticket notification email is missing
- Check the saved notification and event controls, eligible participants, the spam folder, and the administrator's delivery logs. See Email notifications.
Protect private information
- Do not include passwords, API keys, recovery links, or payment information in ticket text, private notes, or attachments.
- Choose the correct visibility before sending an update. Public replies can be seen by the requester and, when applicable, invited customer contacts.
- Use the company switcher carefully. Verify the company name before changing customer, ticket, or configuration records.
- Sign out on shared devices and never share invitation or password-reset links.
API reference
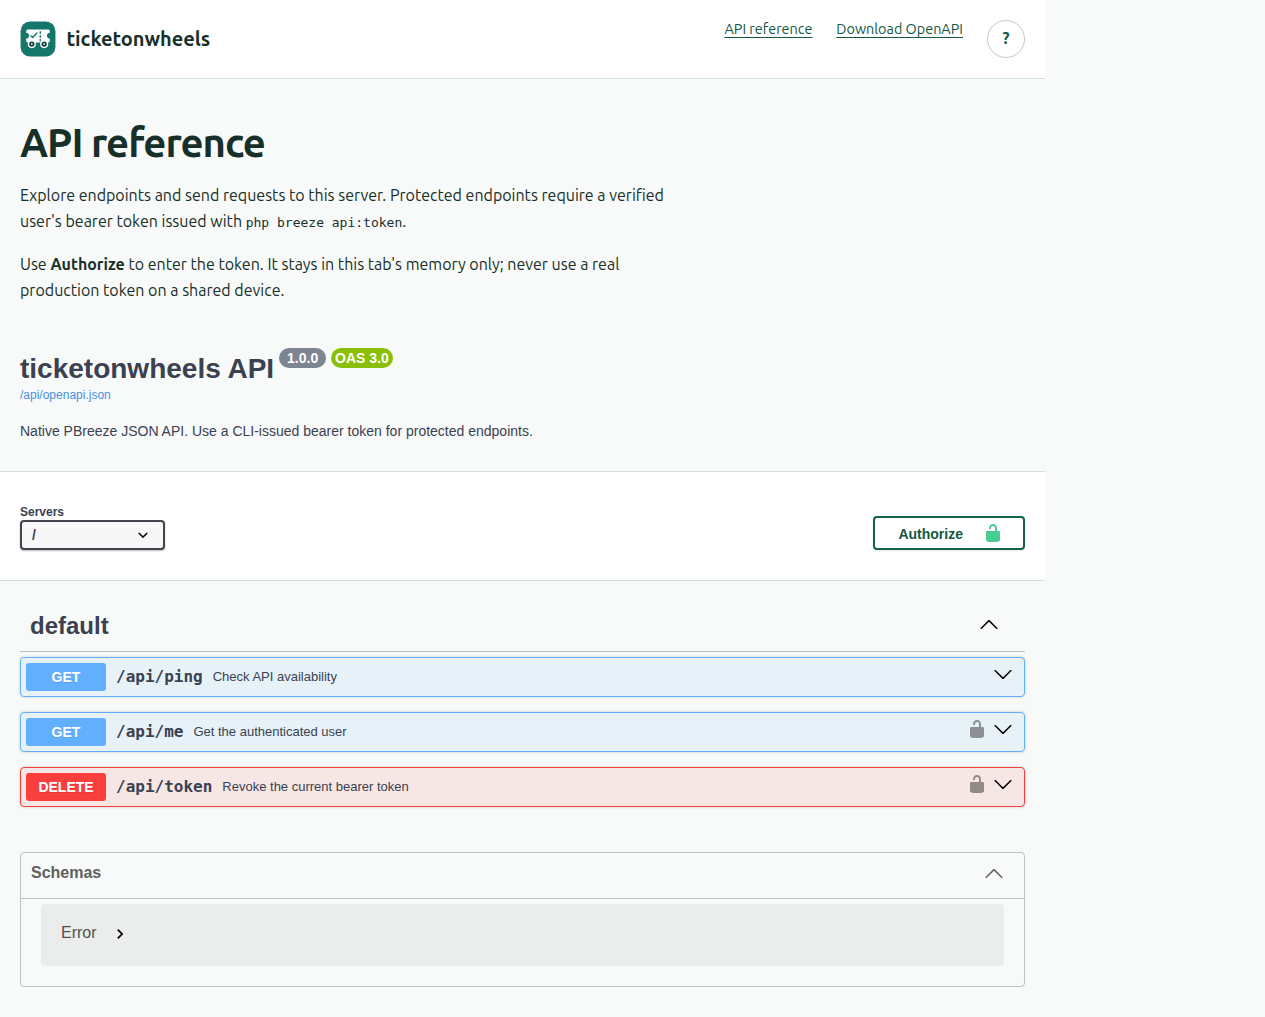
When API documentation is enabled, open /api/docs to browse the interactive API reference or download the OpenAPI definition. This screen is intended for technical users integrating another system with the application.
Protected API operations require a verified user's bearer token. Use the Authorize control only with a token intended for this server. The interactive page keeps an entered token in that browser tab's memory, but do not enter a production token on a shared device or share it in screenshots, tickets, or messages.
The API reference may be disabled or protected by the administrator. Requesters using the normal ticket interface do not need an API token.
Screen and screenshot coverage
This coverage table maps the user-facing screen groups found in the route registries and rendered views to the exact guide section opened by their contextual ? link. Dynamic identifiers are shown as {id} or similar route parameters.
Captured means a real screenshot from a disposable local application with fictional sample records. Manual capture required means the screen is documented but no image is embedded; capture it only in a safe test workspace.
| Application screen | Route | Documentation section | Help anchor | Screenshot | Status |
|---|---|---|---|---|---|
| Welcome page | /welcome | Using this guide | #getting-started | — | Manual capture required |
| Sign in, registration, recovery, verification | /login, /register, /forgot-password, /reset-password, /verify-email | Sign in and account access | #account-access | sign-in.png | Captured (sign-in) |
| My account | /account | My account | #account | — | Manual capture required |
| Company select/create | /companies, /companies/select | Company workspaces | #workspaces | — | Manual capture required |
| Dashboard | /dashboard | Dashboard | #dashboard | dashboard.png | Captured |
| My tickets | /tickets | My tickets | #my-tickets | my-tickets.png | Captured |
| Create ticket | /tickets/create | Create a ticket | #create-ticket | — | Manual capture required |
| Requester ticket detail | /tickets/{id} | Follow up on a ticket | #my-ticket | — | Manual capture required |
| Support queue | /support/tickets | Support ticket queue | #ticket-queue | ticket-queue.png | Captured |
| Support ticket detail | /support/tickets/{id} | Work on a ticket | #support-ticket | support-ticket.png | Captured |
| Edit ticket details | /support/tickets/{id}/edit | Edit ticket details | #edit-ticket | — | Manual capture required |
| Client ticket list/detail/invitation | /client/tickets, /client/tickets/{id}, /client/invitations/accept | Customer ticket portal | #client-portal, #client-ticket | — | Manual capture required |
| Customers, contacts, invitations | /customers, /customers/{id}, /customers/{id}/contacts/… | Customers and contacts | #customers | — | Manual capture required |
| Notifications | /notifications | Notifications | #notifications | — | Manual capture required |
| Service catalog and request detail | /catalog, /catalog/{id} | Service catalog | #service-catalog | service-catalog.png | Captured |
| Catalog management/categories | /admin/catalog/… | Manage the service catalog | #manage-catalog | — | Manual capture required |
| Knowledge browse/article | /knowledge, /knowledge/{slug} | Knowledge base | #knowledge-base | — | Manual capture required |
| Knowledge administration/categories | /admin/knowledge/… | Manage knowledge articles | #manage-knowledge | — | Manual capture required |
| Assets | /assets, /assets/create, /assets/{id} | Assets | #assets | — | Manual capture required |
| Reports, CSV, print | /reports, /reports/tickets.csv | Ticket reports | #reports | reports.png | Captured |
| Morning checklist/history/manage | /support/morning-checks/…, /admin/morning-checks/… | Morning checks | #morning-checks | morning-checks.png | Captured |
| Canned responses and templates | /support/canned-responses/… | Canned responses and templates | #canned-responses | canned-responses.png | Captured |
| Support teams | /admin/teams, /admin/teams/{id} | Support teams | #teams | — | Manual capture required |
| Company memberships/invitations | /company/members, /company/invitations | Company members and invitations | #company-members | — | Manual capture required |
| User administration | /admin/users, /admin/users/{id} | User administration | #users | — | Manual capture required |
| Ticket categories/subcategories | /admin/categories | Ticket categories | #ticket-categories | — | Manual capture required |
| Statuses, priorities, sources | /admin/statuses, /admin/priorities, /admin/sources | Statuses, priorities, and sources | #ticket-options | — | Manual capture required |
| SLA policies | /admin/sla/… | SLA policies | #sla-policies | — | Manual capture required |
| Application settings | /admin/settings | Application settings | #settings | settings.png | Captured |
| Support email | /admin/support-email | Support email | #support-email | — | Manual capture required (credentials are never captured) |
| Email notification settings and test | /admin/email-notifications, /admin/email-notifications/test | Email notifications | #email-notifications | email-notifications.png | Captured (fictional data, no credentials) |
| Audit log | /admin/audit | Audit log | #audit-log | — | Manual capture required |
| Interactive API reference | /api/docs | API reference | #api-reference | api-reference.png | Captured (no token entered) |
| 404 and application error pages | Unknown route / handled server error | Troubleshooting and safe use | #help-and-troubleshooting | page-not-found.png | Captured (404); 500 capture requires manual setup |
| Record deletion confirmation | /records/{type}/{id}/delete | Confirmed record deletion | #deleting-records | — | Manual capture required |